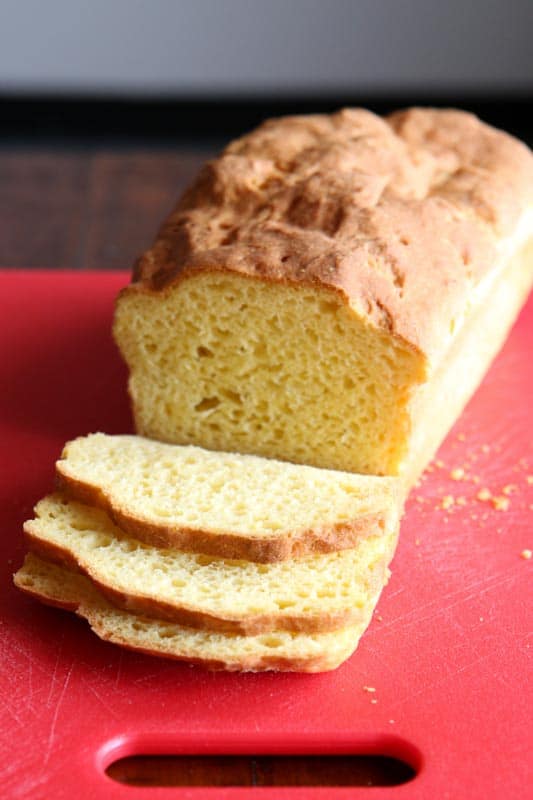
Want soft, delicious gluten-free sandwich bread? Then this recipe is for you! It’s easy to make and comes out perfectly every time.
The Best Gluten-Free Sandwich Bread Recipe: Easy, Delicious, and Soft!
Ah, gluten-free sandwich bread. It’s more than a bit of a pain, isn’t it? The pre-made loaves, while light and tender, are expensive and often filled with holes. Homemade recipes save you money but are often dense–and depending on the recipe dry or gummy.
With these problems, what’s a gluten-free eater to do? My advice: don’t give up on sandwich bread!
I’ve baked my own gluten-free sandwich bread for over a decade. In fact, there’s recipes for sandwich bread in both of my cookbooks. But while I love these recipes, I wanted to make a bread that was light and soft. Kind of like–dare I say it?–Udi’s bread but without the holes and the high price tag!
For about six months or so I’ve been working on this recipe. To be honest, I ate way too much bread and butter during these months. That’s the sacrifice I had to make, I guess. 😉 Finally, FINE-AH-LEE, I have a gluten-free bread recipe that’s easy to make, soft in texture, doesn’t fall apart, and tastes great. Oh, and it’s dairy-free, corn-free, and rice-free to boot. I LOVE this bread.
Let’s talk about how to make it. (BTW, I have a lot to say about how to make gluten-free bread. If you just want the recipe, I suggest you scroll down. Way down. Yeah, way, way down. #BakingTeacher #IHeartBreadAndICanNotLie)
How to Make Gluten-Free Sandwich Bread: The Dry Ingredients
Millet Flour
When I set out to make a soft gluten-free bread, I started by looking at the flours and starches I used in previous recipes. Unlike wheat-based bread, which can be made with only flour, water, salt and yeast, gluten-free bread requires a blend of flours and starches. My original bread recipes both use brown rice flour. At the time (old timey gluten-free baker alert!), it was hard to find any gluten-free flours other than rice flour. Using brown rice flour made sense. Today we have lots of other options.
After giving it some thought, I narrowed it down to two flours: millet flour and sorghum flour. Both are tasty and relatively inexpensive. I ended up using Bob’s Red Mill’s millet flour. Have you used millet? I’m in love with it. While brown rice flour can lend a somewhat gritty texture to recipes, millet reminds me of wheat flour. It’s soft. And it contains more fiber than rice flours! Yup! Cup for cup, millet offers twice as much fiber as brown rice flour. A soft texture and twice the fiber? Awesome!
Next up…starch!
Tapioca Starch
Since I was rethinking the flour, I also wanted to rethink the starch. In my first cookbook, Easy Gluten-Free Baking, my sandwich bread used corn starch. In my second, How to Cook Gluten-Free,I used potato starch. For this recipe, it’s all about the tapioca starch.
You might be wondering why you need starch at all. Good question! Wheat and other grains contain a starch called amylopectin. It’s part of their makeup. When combined with a liquid and heated, this starch gelatinizes. It thickens and almost turns jelly-like. If you’ve ever made a stovetop pudding, you’ve seen this happen. One minute the pudding is thin, the next it thickens. This is good news for gluten-free bakers. Without the stretch of gluten, starch helps hold bread together.
Even though grain contains starch, it’s not enough to make a soft sandwich bread. Enter: added starch. Without tapioca starch, this loaf turns out dense and heavy. In the future, we’ll made some rustic bread. Those don’t always need added starch. This loaf does.
The reason I reached for tapioca starch for this recipe is because it adds an almost gluten-like stretch to recipes. Notice I said “almost”. There’s no 1:1 replacement for gluten. It bakes up lighter than both corn starch (which can get a little heavy) and potato starch (which is light but doesn’t add much stretch).
Xanthan Gum
Ah, xanthan gum. (deep breath) Usually the follow-up question to, “Elizabeth, how do I make bread?” is “Why do I need to use xanthan gum?”
Simply put, you need xanthan gum because gluten isn’t present in the dough. Gluten, which comes from the Latin word for “glue”, provides elasticity and strength to traditional wheat-based doughs. If you’ve ever kneaded dough or watched someone throw pizza dough over their head, you’ve witnessed the stretchiness of gluten in action. Without this rubber band-like protein, gluten-free bread dough lacks the essence of what gives bread structure.
Enter xanthan gum.
While I wouldn’t go as far as calling xanthan gum a gluten replacement, it does prevent gluten-free bread from collapsing in on itself. Made from a microorganism called xanthomonas campestris, xanthan gum becomes very viscous and sticky when combined with water. It doesn’t have the same rubber band-like properties of gluten but it does a good job providing structure to gluten-free breads. If you accidentally omitted it from this recipe, you would have a very short, very dense loaf of bread.
Sugar
There’s a wee bit of sugar in this recipe. It helps feed the yeast and helps the crust to brown. Even though it’s only two tablespoons, there’s a big difference in color and flavor between a loaf made with the sugar and one made without. Feel free to use turbinado (Sugar in the Raw) sugar if you prefer.
Salt
Ah, salt! The amount of salt in a bread recipe seems quite small, doesn’t it? There’s only one teaspoon in the entire recipe. However, salt is an essential ingredient in bread dough. It helps enhance flavor, it controls yeast growth (more about this in a sec), and it helps the crust to brown. If you forget to add salt to a bread recipe, the bread will taste flat and the texture won’t be right.
For this recipe, use table salt, not Kosher salt or sea salt. They don’t measure the same (You need to use 1 1/4 teaspoons of Kosher salt to replace the table salt) and sometimes coarse Kosher salt doesn’t fully dissolve in the bread dough.
One other note about salt: when salt is in direct contact with yeast, it will kill the yeast. Never, ever add salt to your water-yeast mixture. You want to add the salt to the flour mixture and whisk everything together. This distributes the salt and keeps the yeast happy. And happy yeast is happy bread!
Baking Powder
What’s baking powder doing in a yeast bread recipe?! I know. I know. Another ingredient to measure (I’m sorry!). During testing of the bread recipe in “How to Cook Gluten-Free”, I wanted the loaf to have a little more rise. Increasing the yeast didn’t provide the lift I wanted. So I tried adding a little baking powder. PERFECT. Since it worked so well, I borrowed the idea for this recipe. It still works great. Commercial baking powder is double acting. This means it releases gas in the bowl when it comes in contact with liquid and then again in the oven when it gets hot. Adding a little lift during mixing and at the start of baking seems to give the yeast a little more room to do it’s thing.
Instant Yeast
The star of the show! Yeast! (woo-hoo!) For some reason yeast makes people nervous. I understand. Unlike other leaveners, like baking powder and soda, yeast is alive. It needs a little bit of special care. Not a lot of care, just a little.
The main thing is water temperature. For yeast to work, you want your water temperature between 105°F and 115°F. For the best results, grab an instant thermometer and take the temperature of the water. At around 120°F, the yeast begins to die and at 140°F, thermal death point kicks in and the yeast totally dies. (#RIPYeast).
For this recipe, I like to use “Quick Rise” yeast. Depending on the brand, this might be called Rapid Rise, Fast Acting, or Highly Active Yeast. This yeast is dried in smaller particles than traditional Active Dry Yeast. Technically, you don’t even need to dissolve it in water. You can add it directly to your dry ingredients, whisk everything together, and go. I prefer dissolving it in water. It’s up to you. If you decide to add your yeast directly to your dry ingredients, increase your water temperature to 120°F.
“Elizabeth! You just said that yeast begins to die at 120°F! Have you lost it?!?”
First, thank you for paying attention. Second, I might have lost it. I can’t keep track of these things. 😉 AnyWAY, about that temperature. It’s higher because the yeast is never in direct contact with the water.
Lastly, water temperature and keeping yeast away from salt is all fine and good. But you need to start with yeast that’s still fresh. I don’t mean cakes of fresh yeast, that’s a different product. I mean check the expiration date on the packet! If it’s expired, toss it and get some new yeast!
BAKER’S NOTE: Is All Yeast Gluten-Free?
Answer: no. While “Saccharomyces cerevisiae” (that’s baker’s yeast to you and me) is a fungus and is naturally gluten-free, some packaged yeast is NOT gluten-free. Always check the label. As of this writing, Red Star’s Platinum yeast was NOT gluten-free. All of their other products are gluten-free. Read those labels!
How to Make Gluten-Free Sandwich Bread: The Wet Ingredients
Now it’s time to talk about what holds everything together, the wet ingredients!
Water
As written, the recipe calls for only 3/4 cup of water. To measure the water, use a liquid measuring cup or weigh the water (more on that below). As mentioned above, water temperature is key to bread baking. Use water that’s around 110°F. If you want to make a rich loaf of sandwich bread, replace the water with milk. Heat the milk to the same temperature as the water. When milk is used, the loaf bakes up slightly darker and has a creamier taste than a loaf made with water.
Eggs
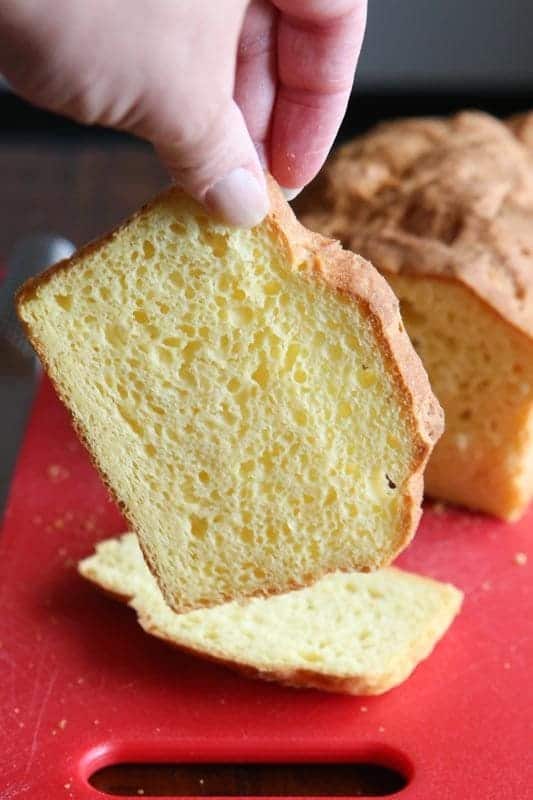
Eggs add fat and flavor to this bread. They also add moisture. Unfortunately, this bread doesn’t do well egg-free. If you look at the photo of this bread, you can see it’s really yellow. That’s because I used local eggs and the yolks were BRIGHT yellow. Did I mention they were bright? When this bread is made with store bought eggs (something I use a lot of the time!), it won’t bake up so yellow. Also, if you prefer a less rich bread, omit the egg yolks and use only egg whites.
BAKER’S NOTE: If you buy your eggs from a local farmer, weigh them before you use them as the size tends to vary. An egg, out of shell, should weight about 50 grams.
Oil
Two tablespoons of fat help to soften the texture of this bread. For this bread, any liquid oil, like olive, canola, or vegetable, works.
How to Make Gluten-Free Sandwich Bread: Measuring
Measuring Dry Ingredients
Successful baking relies heavily on successful measuring. An error in measuring ingredients can cause a recipe to flop.
You have two good options for accurate measuring:
Measuring by Weight
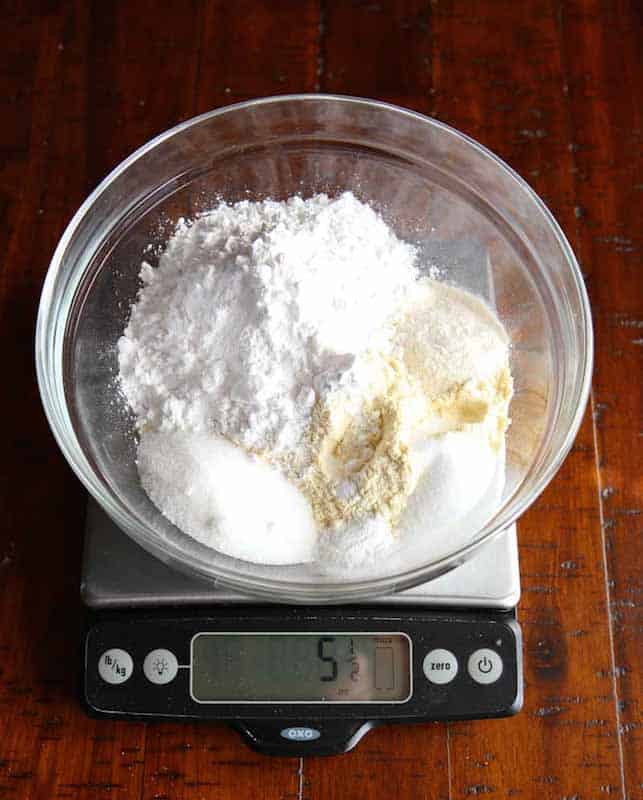
Using a kitchen scale is the most accurate way to measure ingredients. Simply place a bowl on the scale, zero the scale (sometimes called “tare”) and add the ingredients. Zero the scale after adding each ingredient. For this recipe it looks like this: zero —>weigh the millet flour —> press zero—->add the tapioca starch. Done! The rest of the dry ingredients are small and are measured with nested measuring spoons. More on that in a sec.
Measuring by Volume
If you prefer to use measuring cups and spoons, that’s fine. While some claim that it won’t work, I disagree. If you take care when measuring your ingredients, you will be successful. In fact, when I started writing gluten-free cookbooks, few home cooks owned kitchen scales. My entire first baking book relies on volume measures and the recipes work for thousands of bakers.
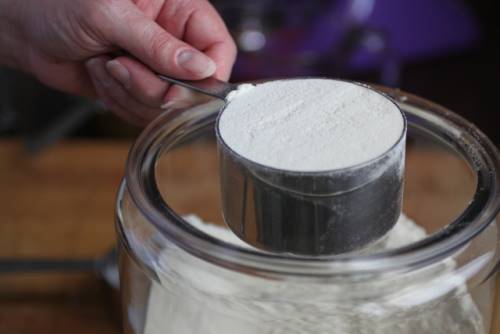
Here’s how to measure ingredients with a dry measure.
1. Select a set of nested measuring cups. (Prefer metal to plastic. Over time, they won’t warp.)
2. Spoon flour or starch into the cup. Overfill slightly.
3. Level the cup with something straight, like a chopstick or the back of a butter knife.
BAKER’S NOTE: Don’t confuse nested measuring cups with a liquid measuring cup. You don’t want to measure dry ingredients in a liquid measuring cup.
Measuring Small Ingredients: Tablespoons and Teaspoons
Small ingredients are best measured by volume. Many kitchen scales aren’t accurate enough to measure a half teaspoon of salt. For small ingredients use a set of nested measuring spoons. I prefer metal as plastic or those “slider” measuring spoons tend to be less accurate.
For small ingredients, you can dip the spoon right into the ingredients, overfill slightly and then level with something straight.
Measuring Liquid Ingredients

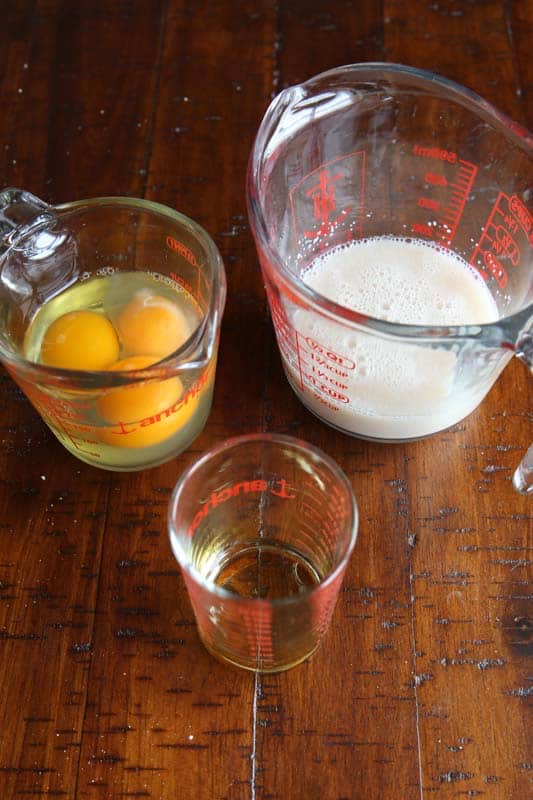
For the water and oil, use a liquid measuring cup, like the one shown above. Fill the cup and squat down to eye level to make sure you have two cups of water. Holding the cup in the air or looking down at it can result in inaccurate measuring. If you are unable to squat down to eye level, Oxo makes an angled measure cup that can be viewed accurately from above.
How to Make Gluten-Free Sandwich Bread: Mixing
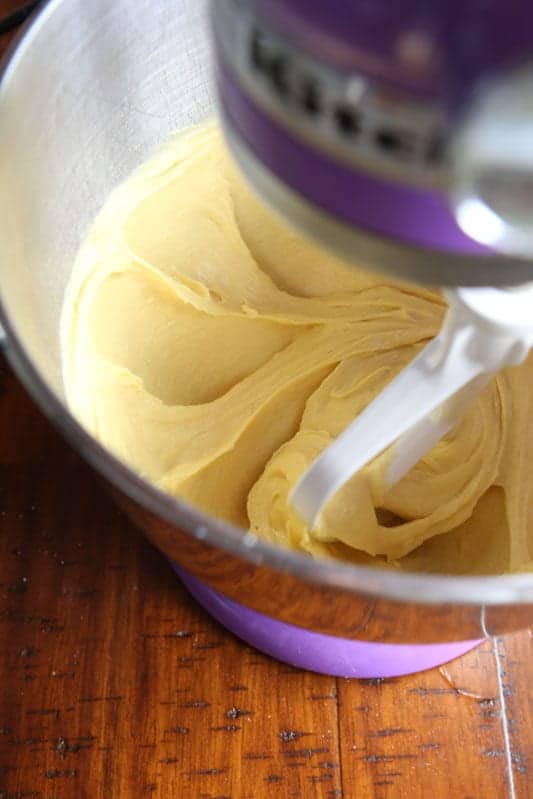
Without gluten to hold everything together, gluten-free bread dough looks very different from traditional bread dough. Instead of forming a smooth dough ball, it looks like a thick, sticky cake batter.
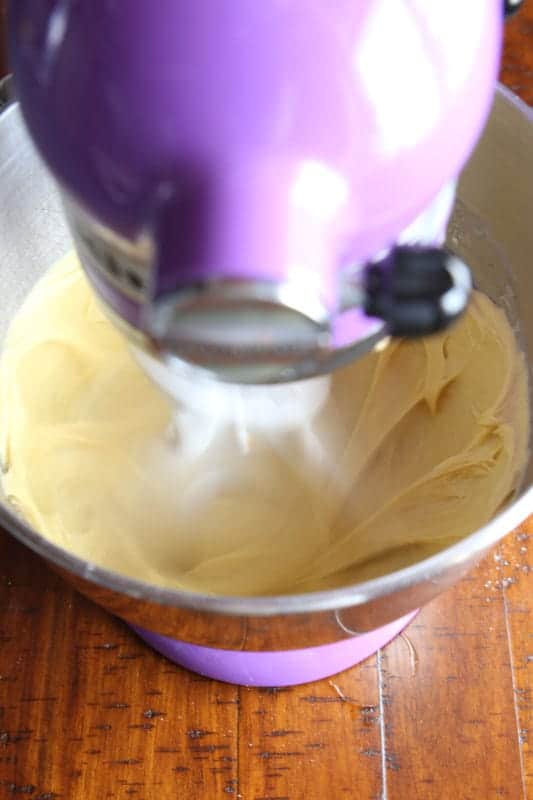
The easiest way to mix this thick dough is with a stand mixer. I use a KitchenAid mixer fitted with a flat paddle attachment. With gluten-free bread, you want to ditch the dough hook. It doesn’t mix gluten-free bread well. The paddle attachment, in contrast, does a great job chugging through our dough. Mix on medium-high speed for about three minutes.
If you don’t own a stand mixer, worry not! You can use a handheld mixer for the job. Again, I like my KitchenAid hand mixer for this job. I’ve found other mixers can’t handle the dough. If fact, over the years, I’ve had several readers tell me that they burnt out the motors of their handheld mixers while making gluten-free dough. Yikes!

Mix the dough until it’s smooth. You don’t want any dry flour hanging around the bottom of the bowl. Use a flexible spatula to clear around the little bump at the bottom of the KitchenAid mixer.
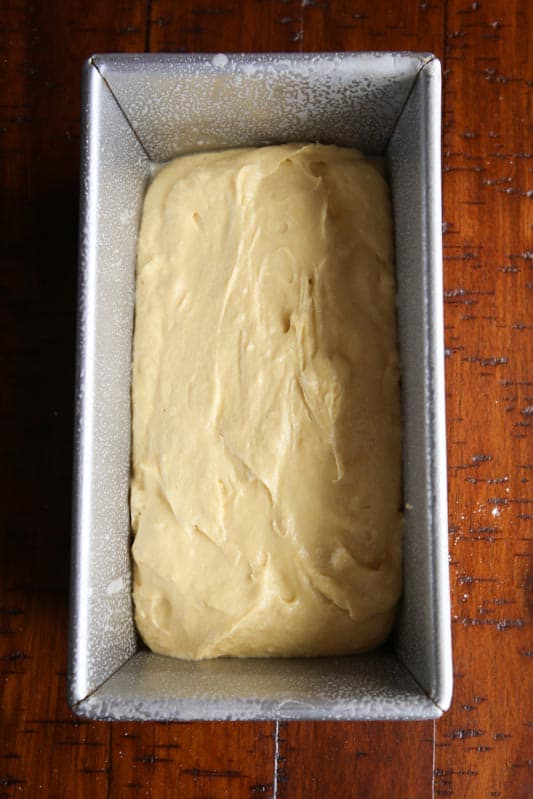
For this loaf, I use a Chicago Metallic loaf pan. It’s a little smaller than a traditional 9×5 bread pan. In fact, it’s 8-1/2″ by 4-1/2″ by 2-3/4″. If you are going to go to the trouble of making homemade bread, I’d strongly suggest you use this pan. It works GREAT. You end up with a loaf of bread about the size of Udi’s. This is smaller than traditional wheat bread but without gluten, smaller is sometimes better for gluten-free bread.
If you don’t want to invest in new pans, that’s fine! Just know that when this bread is baked in a 9×5 inch pan, it won’t rise as high because the pan is larger than the Chicago Metallic pan.
No matter what pan you use, be sure to spray the pan with non-stick cooking spray before adding the dough.
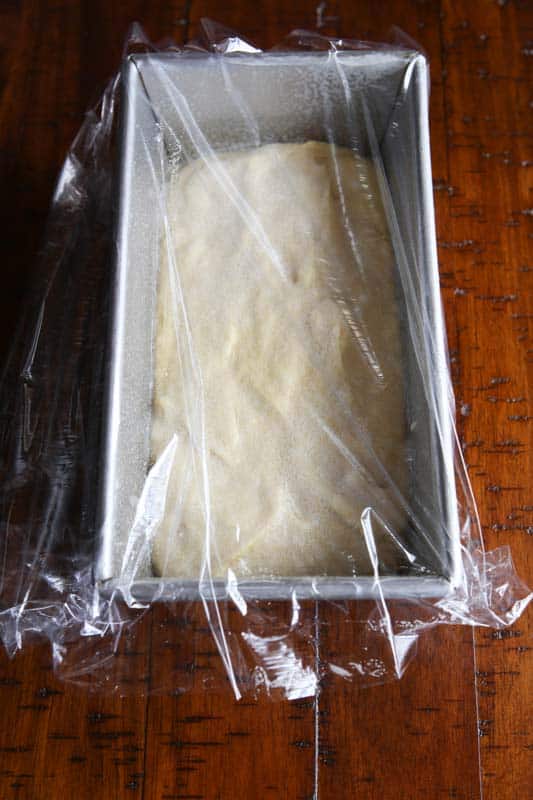
Cover the bread with a piece of plastic wrap that you’ve sprayed generously with non-stick cooking spray. This dough is soft. If you don’t spray the plastic wrap, the dough sticks to it.
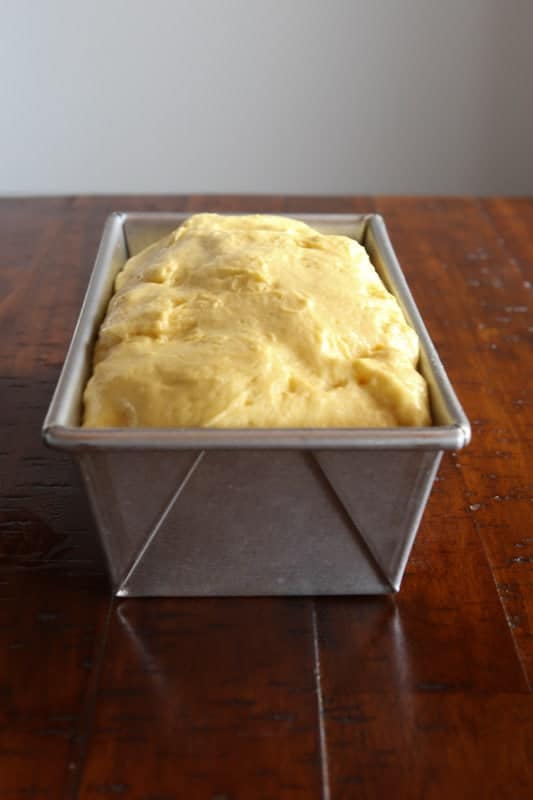
After an hour or so, the dough should have doubled in size. Don’t let it over-rise. While it seems like the higher the rise, the higher the bread, this isn’t true. When dough rises too high, it can collapse during baking. Once the dough doubles, it’s ready to go.
The best place to allow dough to rise is on the counter. If your kitchen is very cold, throw the pan in the oven (be sure the oven is off). You don’t need to find a special spot for the bread. I know some people place their pan of bread on top of the fridge. Um, I don’t remember the last time I dusted the top of my refrigerator. There’s no way I’m putting food up there. 🙂
If you remember that rise time is an estimate, you’re all set. Sometimes bread dough rises fast (usually in the summer) and sometimes it takes its time (usually in the winter.) If after 90 minutes nothing has happened, check to see if you forgot to add the yeast. Occasionally issues with yeast happen but it happens fairly rarely, especially if you follow the directions about yeast above.
How to Make Gluten-Free Sandwich Bread: Baking, Cooling, and Storage!
Finally! It’s time to bake! Yay!
It’s important to preheat your oven before you bake your bread. Something magical happens during the first few minutes of bread baking: the yeast goes into a hyperactive phase. As the temperature of the dough rises, the dough rapidly converts sugars (from the starches in the flour) into carbon dioxide. At the same time, the water in the dough turns to steam. This boost of carbon dioxide and steam help the dough to rise. Oven spring can account for an additional 10% rise.
And then…it all stops. When the temperature reaches 120°F, the yeast hits its thermal death point and dies off. No more rise occurs after this point.
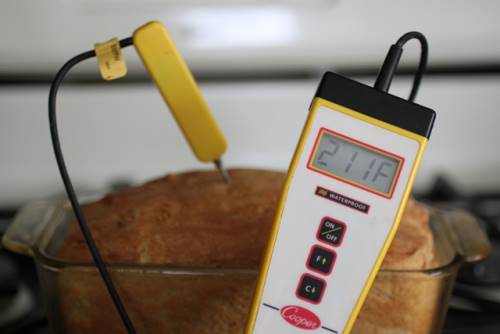
Taking the Temperature
I find it difficult to judge exactly when a loaf of bread has baked all the way through. There’s nothing more disappointing than spending time baking a loaf of bread only to find out that the very center of the bread is under baked. Thankfully there’s a simple solution to this problem: take its temperature. Yup, just like you’d do for a turkey at Thanksgiving!
Stick an instant read thermometer into the center of the loaf. Don’t poke the edges of the bread, the temperature is hotter there and won’t tell you if the center has baked.
The bread should reach 210°F or above. This is slightly higher than the temperature for wheat dough but I’ve found that once gluten-free bread hits 210° F, it’s done.
Cooling
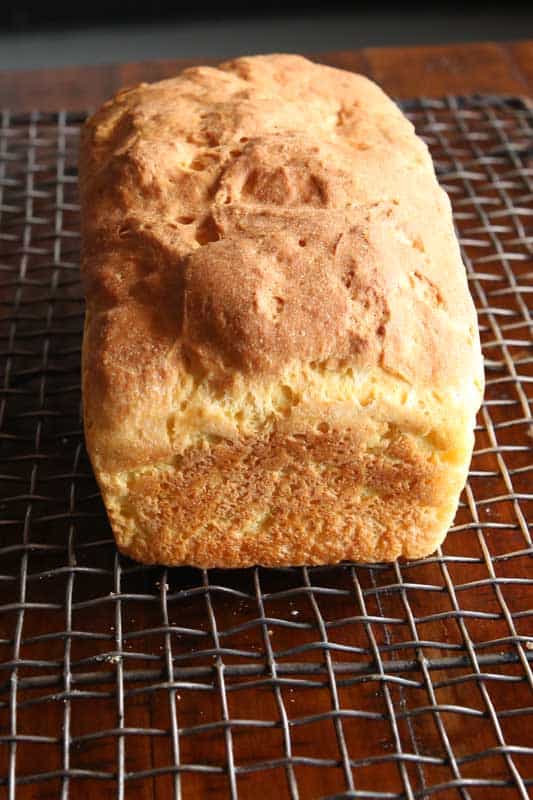
When the bread comes out of the oven, it’s done baking, right? Wrong! It’s almost done baking. Carryover baking occurs because the loaf is so hot. How hot? The loaf is steaming hot and it’s this steam that can cause problems for the gluten-free baker. Remember our friend xanthan gum? It loves to suck up water and it doesn’t stop doing this after baking. You want to ensure that the steam can escape from the baked loaf. If it doesn’t, the xanthan gum and starches can “grab” onto it. This leads to a gummy loaf of bread and soft crust.
To prevent a gummy loaf, remove the loaf from the baking pan and place it on a wire rack to cool. If the bread cools in the pan, the steam gets trapped and the loaf gets soggy, especially on the bottom.
Cutting
Once the bread is cool (or almost cool if you are impatient), it’s time to cut it. Use a serrated knife. Let me say that again, use a serrated knife. A smooth-blade knife will squish the bread. Lots of people ask me how to slice straight pieces of bread. Um….this is one that I can’t help with. They sell bread-cutting guides if this is an issue for you.
Storage
After doing all that work, you don’t want your loaf to get moldy or stale, right? Right!
Bread tastes best the day it’s baked. You can store it on the counter for a day or two. But if you know you aren’t going to eat an entire loaf in a day, here’s what I recommend: allow the loaf to cool, slice, place a piece of waxed paper or parchment between the slices, and slide the whole thing into a freezer bag. When you want a piece or two of bread, remove the bread from the freezer. You can either thaw at room temperature or microwave for 15 seconds.
BAKER’S NOTE: Never store bread in the refrigerator. It stales very quickly in the fridge. Either store bread on the counter overnight or freeze it.
Are you ready to make bread? Yeah, I thought so! Here’s the recipe. Enjoy it!
Shop the Recipe
The following are affiliate links. When you use them to shop, GlutenFreeBaking.com earns a commission.
Digital Scale
Liquid Measuring Cup
KitchenAid Stand Mixer
Bread Pan
Rubber Spatula
Oven Thermometer
Digital Thermometer
How to Make the Best Gluten-Free Sandwich Bread
Easy gluten-free sandwich. Makes a loaf that's tender and tasty!
Ingredients
- 3/4 cup warm water, about 110° F (6 ounces; 170 grams)
- 1 packet instant/rapid rise yeast (2 1/4 teaspoons; 7 grams)
- 1 1/2 cups millet flour (6 ounces; 170 grams)
- 1 cup tapioca starch (4 ounces; 113 grams)
- 2 tablespoons granulated sugar (1 ounce; 28 grams)
- 2 teaspoons xanthan gum
- 1 teaspoon table salt (not Kosher salt)
- 1/2 teaspoon baking powder
- 3 large eggs , whisked (about 5 ounces; 150 grams total, out of shell)
- 2 tablespoons olive or vegetable oil
- 1 teaspoon apple cider vinegar
- *if desired , replace the eggs with 3 large egg whites.
Instructions
-
Whisk together water and yeast in a small bowl. Allow to stand for five minutes.
-
In the bowl of a stand mixer, combine millet flour, tapioca starch, granulated sugar, xanthan gum, salt, and baking powder. Whisk to combine. Fit the stand mixer with the flat paddle attachment. Add the yeast mixture, eggs, oil, and vinegar. Mix on medium speed until smooth. Dough will be thin.
-
Spray an 8-1/2" by 4-1/2" by 2-3/4" loaf pan with nonstick cooking spray. Spread dough evenly into the pan. Spay a piece of plastic wrap with nonstick cooking spray and place plastic wrap loosely on the pan. Allow dough to double in size. This takes about one hour.
-
When dough has doubled in size, preheat oven to 350°F. Remove plastic wrap from the top of the pan.
-
Bake until the internal temperature of the bread reaches 210°F, about 45 minutes. (If the crust gets too dark before the internal temperature reaches 210°F, place a piece of foil onto the bread. This prevents the crust from burning.)
-
Remove bread from the oven and allow to cool for two minutes. Transfer bread to a wire cooling rack to cool completely.
-
When cool, slice into pieces with a serrated knife.
-
Store bread on the counter for up to three days or freeze sliced bread, wrapped in freezer wrap with waxed paper between each slice, and placed into a freezer container, for up to six weeks.
Recipe Notes
This easy recipe for gluten-free sandwich bread contains no corn, dairy, or soy. Be sure to use an 8-1/2" by 4-1/2" by 2-3/4" pan like this one by Chicago Metallic. If you don't have this pan, use a 9x5-inch pan. Bread baked in a 9x5-inch pan will bake up shorter than bread baked in an 8 1/2 x 4 1/2-inch pan.
Cata says
Hi! Can I use brown rice flour? How different do you think the result will be?
Elizabeth says
It works really well. The flavor and texture are a bit different but it makes a lovely loaf of bread.
Mary Lee says
Love the bread, but mine collapses every time. Flavor is good, texture is good, but shape is almost a star shape. I’ve reduced rise each time. The last time I let it rise only about halfway to top of pan. PS when it bakes, it rises much higher. It comes out looking like a showpiece loaf…for about 2 min then it collapsed
Kate says
Usually when baked goods collapse, the rising agent was too much or excessive moisture remains. Lots of info online about it. Hope this helps.
Mary Lee says
I’ve seen all the posts about over rising, and that isn’t it since I barely let it rise much at all. Could it be over mixing? I use a kitchenaid (thank you )
Mary Hurt says
I am on a crazy lectin free diet. This bread recipe literally saved my life. I just adjusted the tapioca starch down to 50% (there are some lectins there) and used half cassava flour. Also added 2 T of Lecithin granules. This is the best bread I have had in years and now will be a staple in our home. THANK YOU MORE THAN I CAN SAY!
Kate Yonder says
Friends, this recipe is the one. The texture is perfect. This bread had my non-gf husband devouring my gf bread. I’ve baked many disastrous, dense piece of rocks in the past. But never again. This bread is soft and delicious. It’s also taste-free so I’ll have to add a bit more salt and apple cider vinegar to the next round of bread…because there will be more of this. This is my new go-to gf bread recipe. Thank you so much for sharing this recipe. Btw, I used King Arthur’s gf flour mixed with the tapioca flour. Tapioca! Who knew! Oh, I also used a hand mixer for four or five minutes to get the smooth, thick cake batter consistency.
Paola says
Can I use a substitute for the yeast if yes what do you recommend as my daughter has an extensive list of things I can’t use. Also can I substitute the egg white with chickpea juice
Noreen Noreenwilkin says
The recipe in exact quantities would be great & helpful please
I couldn’t recipe in its form.
Thank you for sharing.
Elizabeth says
Hi Noreen,
If you have “reader view” turned on, you might not have seen it. The recipe is right above the comment section. I hope this helps!
Natalia Ina says
Hi… it’s ling way to go to the recipe..but your complete review of ingredients and other know-how..they are such a precious treasure for me. Thank you very much. I am going to try this recipe with sorghum flour.
Elizabeth says
There’s a jump to recipe right at the top of the page.
Cheryl says
I made this bread and put the dough in 20 muffin cups. Let it rise for about 40 minutes and then baked at same temp for about 45 minutes. They came out great. My husband thinks this is one of the best breads he has eaten, hands down.
A Tegarden says
This was by far the best GF bread I’ve ever made. It wasn’t super dense and it tasted amazing. My 10 year old has issue with gluten and she agreed that it was the best so far!! Thanks for posting!
Rosemary Hulme says
I give this recipe 5star….I’m confident that it was so much easier because you gave us explainations why and how each step was done….easy reading and even thought I’ve been baking bread for 50 odd years.I learned lots of why I was doing things and of course Baking Gluten free is a little different.
Pam W. says
I am seriously in love with this recipe!! Tried a couple other times to do gluten-free bread in a bread machine, and they were disasters to say the least. Not only did it take less time to make this bread, it is indeed light and fluffy on the inside, and browned beautifully and evenly all around. I did use foil for the last 10 minutes. It turned out beautifully!! Thank you so much!!
Gerry says
Love this bread. Best gf bread yet. I did use 1/2 cup of ground flax in place of 1/2 cup of the millet flour for a different flavour. Turned out perfect. So tasty toasted. I used a scale and the measurements exactly. Thank you!!
Kathleen says
My son has an issue with gluten, rice flour, baking soda and dairy, so this recipe worked well for him. We omitted the baking soda, added one egg and used 2t. potato flour to get the rise and the structure the baking soda may have added. It tasted like an egg bread which is not a bad thing.
Thank you for putting the time and energy into developing this.
Judie Dannenberg says
Hello: I am getting ready to try this recipe for the first time today. I notice errors in the ingredients list: 1 1/2-cups millet flour equals: 12-ounces or 240.7-grams NOT 6-ounces or 170-grams as you have listed. And I-cup tapioca flour (same as tapioca starch) equals: 8-ounces or 226-grams NOT 4-ounces or 113-grams as you have listed. So, which measurements are the ACCURATE ones? Thank you.
Nao says
Her measurements are correct. Remember that different substances weigh differently, hence the measurements she gave. Hope this helps.
Jen says
Made my first ever loaf of bread today. It worked perfectly. Thank you for this recipe. Its fantastic.
Kristine says
I don’t have apple cider vinegar on hand, can I replace with distilled vineger?
Elizabeth says
You sure can!
Elaine King says
I made it for the first time I used just egg whites.Loved it. I covered it after 30 minutes as I have a fab force oven. I allergic to wheat and rice flours tried other recipes but really liked this one the best so far
TR says
Best gluten-free bread I’ve made.
Tiny Baker says
This was so easy and uncomplicated. I have spent 8 years trying to make a decent loaf of bread. I don’t want rice and potato but have tried and they all failed.
This is fantastic! I had bought fresh millet to try it. Unlike my other brand, the millet
from Relative Foods was pail yellow not tan. The bread baked up and looked just like your pictures. The taste and texture were clean and light. You need to contact them and submit this recipe, they don’t have a bread recipe.
Anita Mani says
Can one substitute quinoa flour for the millet flour?
Elizabeth says
Yes. That should work!
Tracey says
I made this today! Wow!!! Measured by weight, and sub sorghum flour for millet . Best sandwich bread I’ve ever made!! Thank you!