To me, Christmas morning smells like burnt panettone. After spending Christmas Eve cooking a huge meal, my mom did not make Christmas breakfast. Instead she burned panettone. And I loved it.
I’m sure she didn’t mean to burn the panettone. But the Italian holiday fruit bread never seemed to make it out of the toaster without singeing—sometimes a little, sometimes a lot. Looking back, I can see that paper-thin slices of a sweetened, rich bread never stood a chance in our toaster. And now, it’s hard to find a gluten-free way to recreate that taste memory.
Unless, of course, I made my own gluten-free panettone. With a little patience (this bread takes about 16 hours from start to finish), a sturdy mixer, and a few gluten-free flours, homemade gluten-free panettone is fairly easy.
If you’ve never made gluten-free bread before, you might want to check out my recipe for sandwich bread for a few tips on gluten-free bread baking.
Getting Ready
Traditional panettone uses a biga—a pre-ferment made from a mixture of flour, yeast and water that ferments overnight—to achieve a high rise and a nice deep flavor. This is good news for gluten-free baking—thanks to the lack of gluten and the amount of fat and sugar in the dough, this loaf needs all the help rising it can get. (By the way, the biga doesn’t work alone. The finished loaf contains a generous amount of active dry yeast and a little baking powder to aid its rise.)
To get the full benefit of the biga, mix it about twelve to fifteen hours before you plan on baking. Just stir the ingredients together and let the yeast do its thing while you sleep. You might find the consistency of the biga a little startling. This gluten-free biga is wet, thick, and sticky. It looks a bit like marshmallow fluff.
After mixing your biga, combine the dried fruits with lemon and vanilla extract. Macerating the fruits overnight infuses them with flavor. Since many people dislike the classic panettone fruits of citron and candied lemon and orange peel, I’ve include a list of alternative dried fruit options for the recipe. No matter which fruits you choose, all benefit from an overnight soak.
Mixing the Dough
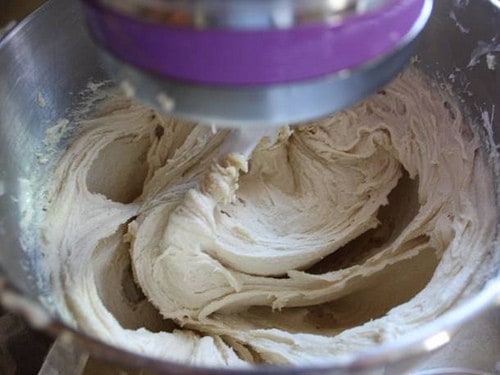
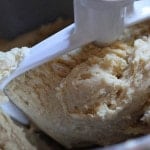
To prepare the dough, you’ll first mix the wet and dry ingredients together until a dough forms. Like most gluten-free bread dough, this dough does not form a firm ball. Instead it’s a really thick, wet dough, almost a cross between a dough and a batter. To chug through the dough, you’ll want to use a stand mixer fitted with a paddle attachment.
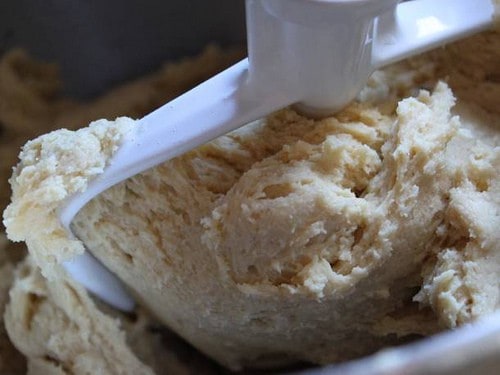
After the dough forms, add the butter. Be sure to use very soft butter for this step. Anything harder leaves clumps of butter throughout the dough. To test the butter’s softness, stick your finger (or a fork) into it. If your finger sinks easily into the butter, it’s the right consistency.
The dried fruits go in last. Reduce the mixer speed to low and add the fruits, mixing until the fruits are just incorporated.
Rising and Punching
The panettone goes through two rises. For the first rise, just cover your bowl with a piece of greased plastic wrap and allow the dough to rise for about two hours. In approximately two hours, the dough should double in size. Once it doubles it needs to be punched down.
Since this dough is so sticky, you don’t want to punch it with your bare hands or you’ll end up with dough all over yourself. Instead, stir it gently with a greased wooden spoon or rubber spatula until it is almost fully deflated, or use the piece of greased plastic wrap that covers the bowl to help punch down the dough. I prefer the second option. Simply remove the plastic wrap from the bowl and place it loosely over the dough. Deflate the dough by using your knuckles. The plastic wrap barrier between your hand and the dough prevents the dough from sticking to you.
No matter how you do it, deflate the dough about 75% and then spoon it into a prepared pan.
Shaping: A Pan or a Paper?
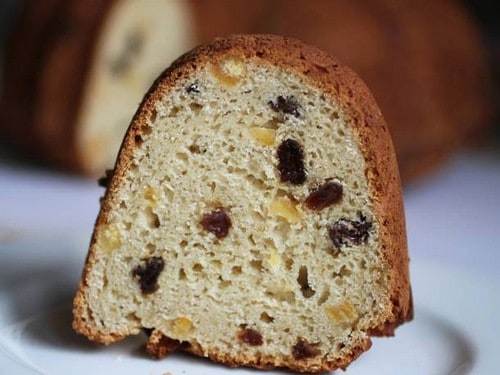
Tradition dictates that you bake panettone in paper. While pretty, paper doesn’t make the best vessel for baking gluten-free bread. Each time I made this recipe in paper, I ended up with raw spots in the center of the loaf. Gross!
Baking panettone in a tube or Bundt pan can help to prevent raw spots. The rod in the center of the pan gets hot during baking and thoroughly bakes the center of the loaf. Of course, it doesn’t look quite like a traditional panettone, but I’d rather have a funny-looking panettone over a raw one.
Baking
This loaf takes about one hour to bake. The finished loaf should be between 207-211°F. (Take the temperature in the center of the loaf, not near the sides.) When the bread reaches the correct temperature, remove it from the pan and place on a wire rack to cool.
Serving and Storing
I love this bread served as is or toasted. To avoid burning panettone like my mom did so many times, slice the pieces at least 1/2-inch thick. And be sure to keep your eye on the bread as it toasts.
Wrapped, this bread keeps for about three days on the counter. If you don’t plan on eating the entire loaf in three days, wait until the panettone cools, slice it, and freeze.
Ready to Bake? Here’s the Step-by-Step
The dry ingredients are mixed with the wet ingredients and the biga. At first the dough is thick.

Softened butter goes in a little at a time. You want your butter soft, not cold.
After you add all the butter, the dough looks very soft. This is totally normal.
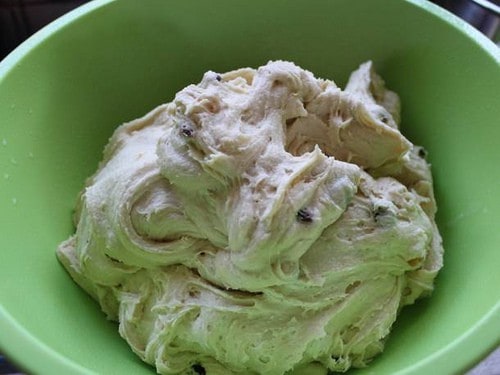
After the fruit is added, transfer the dough to a large greased bowl. Why large?
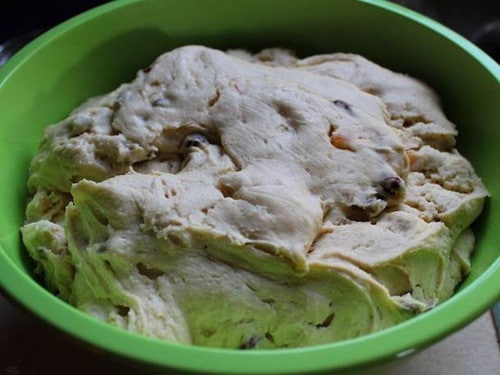
The dough doubles in size! Hence the need for a big bowl.
Have a bit of pent-up holiday anger? Take it out on the dough! It needs to be “punched” down before the second rise. Don’t have holiday anger? Punch it anyway!
Once you’ve punched the dough, transfer it to a well greased bundt pan.
The dough rises again. This rise takes about one hour. And then…
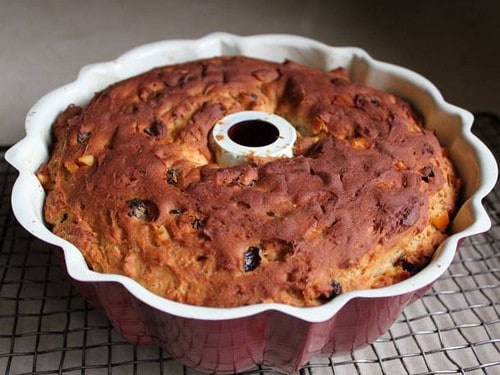
You bake it! Isn’t it pretty?
Slice it up. Pour yourself a cup of coffee and call it day!
How to Make Gluten-Free Panettone
Ingredients
For the Biga
- 3/4 cup water (6 ounces; 170 grams)
- 1 teaspoon active dry yeast
- 1 1/2 cups finely ground white rice flour (6 ounces; 170 grams)
- 1/2 teaspoon xanthan gum
For the Fruit
- 1 cup raisins (about 4 ounces; 113 grams)
- 1/3 cup candied orange peel (about 1 1/2 ounces; 42 grams)
- Zest of one lemon
- 1 tablespoon freshly squezed lemon juice (1/2 ounce; 14 grams)
- 2 teaspoons vanilla extract
- 1 1/2 teaspoons lemon extract
For the Dough
- 2 1/3 cups brown rice flour (11 1/2 ounces; 326 grams)
- 3/4 cup sorghum flour (3 3/4 ounces; 106 grams)
- 1/2 cup potato starch (2 ounces; 56 grams)
- 1/2 cup granulated sugar (3 1/2 ounces; 100 grams)
- 1 1/2 teaspoons xanthan gum
- 1 teaspoon baking powder
- 1 teaspoon salt
- 1 cup milk (whole or 2%), warmed to about 100°F. (8 ounces; 226 grams)
- 2 (1/4 ounce) packets active dry yeast
- 3 egg yolks (about 1 1/4 ounces; 33 grams)
- 2 large eggs (about 3 1/2 ounces; 100 grams, out of shell)
- 2 tablespoons vegetable oil (3/4 ounce; 24 grams)
- 2 tablespoons corn syrup or honey (1 1/3 ounces; 39 grams)
- 1 stick unsalted butter, softened (1/2 cup; 4 ounces; 113 grams)
- non-stick cooking spray
Instructions
-
Prepare the Biga: Combine water and yeast in a small bowl. Stir. Allow mixture to stand until yeast dissolves, about two minutes. Whisk together white rice flour and xanthan gum in a small bowl. Add water and yeast. Stir to combine. Mixture will be thick and sticky. Cover bowl with plastic wrap and let rise overnight at room temperature.
-
Prepare the Fruit: Combine raisins, candied orange peel, lemon zest, vanilla extract, lemon extract, and lemon juice in a small bowl. Stir. Cover bowl with plastic wrap and let sit overnight at room temperature.
-
Prepare the Dough: In a small bowl, stir together milk and yeast. Allow to stand for five minutes.
-
In bowl of stand mixer, whisk together brown rice flour, sorghum flour, potato starch, granulated sugar, xanthan gum, baking powder, and salt. Add yeast mixture, egg yolks, eggs, vegetable oil and corn syrup. Mix on medium speed with flat paddle attachment until dough is thick, about three minutes.
-
Add biga. Mix for one minute to combine. Scrape down bottom and sides of bowl with rubber spatula.
-
With mixer on medium speed, add butter one tablespoon at a time. Wait for each tablespoon of butter to incorporate before adding next tablespoon.
-
After all butter is added, mix dough for one minute. Dough should be thick and smooth. Reduce mixer speed to low and add dried fruits. Mix until fruits incorporate throughout dough.
-
Lightly oil medium bowl with non-stick cooking spray. Transfer dough to greased bowl.
-
Cover bowl with plastic wrap and allow dough to rise until doubled in size, about two to two-and-half hours.
-
Deflate dough by about 75%. Do this by either punching down dough with a piece of plastic wrap between your hand and dough or stir dough using a rubber spatula.
-
Generously grease 12-cup Bundt pan with non-stick cooking spray. Spoon dough into pan and smooth top with rubber spatula.
-
Cover pan with greased plastic wrap and set aside until dough almost reaches top of pan, about one hour.
-
Preheat oven to 350°F. Bake loaf until internal temperature reaches 207-211°F, about one hour. Loaf will be dark brown. If loaf gets too dark before internal temperature reaches 207°F, cover pan with a piece of aluminum foil and continue to bake.
-
Invert loaf onto wire rack to cool. Store tightly wrapped in plastic for up to three days or freeze.
Recipe Notes
For the Fruit
The listed fruits are suggestions. Any dried fruit works well in this bread. Dried cranberries, apricots, and cherries are especially nice.
Greg says
Hi Thanks for the formula! 2 questions. What is the reason for the gum in the pre-ferment?
What is the purpose for a second rise since you are not developing any gluten? Are there other proteins that are developed by the second rise?
Thank you and your article was very helpful!
Elizabeth says
Greg–
Good questions!
1. The xanthan gum is in the preferment to provide structor. Without it, the dough is very dense and heavy and, in my experience, doesn’t the dough to rise as well.
2. The double rise enhances flavor. I don’t do a double rise for my sandwich bread but since this is such a rich dough, it benefits from a longer ferment.
Hope this helps!
Susi says
Hi, I appreciate this recipe is dated 2016, but I’ve only just come across you!
I hope you’re still going!
Will this recipe work without the sugar please?
Thank you
Sharon says
I made this with some substitutions to make it dairy-free as well. I used almond milk in place of the milk, melted coconut oil instead of vegetable oil and Stork for Pastry and Biscuits instead of the butter.
I also reduced the xanthan gum a bit – a pinch in the biga with the addition of a teaspoon of gluten free baking fix (modified cassava starch). For the dough I used 3/4 teaspoon of xanthan gum and a dessertspoon of baking fix. I substituted agave syrup for the honey.
The panettone came out nice and soft. Like all panettones you have to eat it fairly quickly as it goes stale within a few days.
Elizabeth says
Glad to hear it worked even with lots of substitutions! That’s great.
Karin Freeman says
I love it when it’s stale. It holds together and you can make FRENCH TOAST!
Alex says
Do you have any advice to make this recipe dairy free? Would a straight substitution with almond milk and margarine be OK?
Thanks. I look forward to giving this a go soon.
Elizabeth says
I think so. Sometimes almond milk gives an off flavor but I think it would work in this recipe. As for the butter, I’d use Earth Balance. It works great as a dairy-free sub!
Rachel says
Have you ever tried making individual size ones in a muffin tin? I wonder how those would turn out.
Elizabeth says
I bet that would work great! I’d reduce the baking time, if you try it in a muffin tin. Have fun!
Rachel says
Would it be possible to substitute the rice flour with any other flour?
Elizabeth says
Sure! You could use millet or sorghum flour. Enjoy!
Matt says
The biga recipe states 1 1/2 cup flour but by weight only 6 ounces. Help? The biga turned out very thick almost like a wet dough? Is this how it is supposed to be? Typically in Gluten baking the started or biga resembles a pancake batter.
Elizabeth says
That sounds right! It definitely should be thicker than pancake batter. ?
Karin Freeman says
This is one recipe that is conducive to our gluten free disgusting batter. Super soft wihich is just what the “wheat” version does. So I make this more than once of year. Definitely on mothers day so you can have that perfect sweet toast! I wondered about slivered almonds… Think I’ve had it both ways. Also what about chunks of melted marzipan in your toast? Wouldn’t that be delish with butter in the morning? Thanks for this recipe, Totally love it!
Elizabeth says
Karin–
I have to say, your comment made me chuckle! Glad you enjoy the recipe.
Sliced almonds and pieces of marzipan both sound AMAZING. Yum! Yum!
nicole mantha says
for the cake pan, is it 12 inches or 12 cups?
Elizabeth says
Hi Nicole,
It’s a 12-cup pan!